Statement of intent
My chosen theme for this year is light and dark or also often referred as black and white most of the time. I want to create a website that showcases my ideas, growth, creative work, and contemplation on the theme of light and dark. I will select my favorite photographs and exhibit them in a final gallery at the conclusion of my coursework period. This topic includes taking pictures with a high iso and using black paper and shade and different types of objects to make it as dark as possible and it does not necessarily have to be black and white only as the name suggests it just has to be light and dark as some of the photos I will be taking. I will present my work by taking a variety of photos linking to this subjects by either using a black and white filter or whatever means to make it black or dark and I am going to have to bring in some objects that are black or white for the contrast to be there and for the images to link to my work. I will take and make multiple galleries and upload them here on this website weebly. In my final images these images hopefully and should be more enhanced and developed and I will be able to put these images into photoshop for my refinement which can make the photos look better and improved which will then also go into my final gallery to show the progression I have made overtime.
For my initial research I will begin by diving in further and looking at light and dark photographers. Currently I have found 3 photographers that I have kept in mind to research. These three artists are the following Fan Ho, Liam Wong and Andrew Shiels. All these artists link to my topic and them of light and dark photography and they have high quality images therefore I have decided to research and develop more of my skills through their advice.
The first artist out of these three I want to talk about and I had chosen to research was the photographer by the name of Fan Ho. He earned his fame as one of Asia’s most beloved street photographers capturing Hong Kong in the 1950’s and 60’s. His images are very detailed and were taken with high details and skills. Not only that but some of the photos and images he had captured link to my work and therefore I had chosen him as I will be able to learn and consume knowledge from him to use in my photos that will enhance and improve my images a lot more. In addition he shares how he creates these images and the different methods, techniques and setting there is and how you can create and produce similar images which I will be using.
The second person I had picked and I want to research is Liam Wong who is a game developer also and ironically the photos he captured also looks like a game and the different color of lights and different angles of lighting creates that and I like how he uses his surroundings and the different environmental factors in his images to add more detail or make it look a lot more better. The way he utilizes his surrounding using the rains reflection to create a more contrast between the lighting. He is also one of the perfect examples of light and dark not only being black and white but can be in color too as long as it has the light and dark theme. He also has advice on how to create these images therefore it will be useful to learn and develop my skills from him.
The final and third photographer I have chosen to research is Andrew Shiels who specializes in almost every aspect of photography. I had a look on his website and noticed the different variations of themes and how highly detailed each of these images are and themes. Not only does he have amazing work but he shows and demonstrates how to create these images and what settings and techniques required to make the image better. The main reason I have chosen him is for his slow shutter speed images and the light trails he creates I was quite intrigued by those photos and how to create them and the process for it.
A few photoshoots I intend to complete are taking images using a studio shot setup and being in a dark room with a source of light like a torch or lamp that I can reflect onto a pinecone or onto a chess piece and create that light and dark theme and I want top try and create a shadow behind the object as I think it would look quite nice and will add that extra detail to the image. I will create different lighting as well by changing the white balance on the camera or I will get a light with different toning.
Another photoshoot I intend to complete is using some shiny silver cards I have at home to create a nice reflection in the card from the light I will most likely use the same setup as for my other one and use studio shot equipment to create this image. I want to create different reflections and shines with the light and zoom in and out on the card details and texture and use a variety of different organizations of cards and how I will organize and setup single or triple cards lined up or stacked or just one individual card to take photo's of and just capture the light bouncing off.
In addition for a third photoshoot I had in mind that I wish to complete is to go out into public or town and into the cities and where all the landscapes are to try and take some images of buildings and such and capture any framing in town and see what I can frame and go down into some gardens and areas to try and capture some images of the trains, tracks, buildings, flowers, framing, plant and such. I would prefer to go in day time as I will be able to capture the sunlight and see it reflecting through the windows of the structures and buildings as I think that will produce some nice outcomes and images.
I am going to experiment the best way to create light and dark images by first messing around with the iso and white balance and such on the camera to see how dark I can get the image to be and how much detail I can capture at the same time and which angles and such I will take the image from and point the lights to create that reflection. I will see what surroundings and areas I will take the images like taking it in a dark room or putting my objects into a all black box to create the black background all around
Fan Ho

Context
Fan Ho (1931-2016) earned his fame as one of Asia’s most beloved street photographers capturing Hong Kong in the 1950’s and 60’s. Fan Ho’s photographic career started in Shanghai at the early age of 14 when given his first Kodak Brownie for his birthday from his father. Within the first year he won his first award. In 1949, the family moved to Hong Kong where the young Fan Ho continued pursuing his love for photography. At the age of 18 he acquired his twin lens Rolleiflex with which he captured all his famous work. At a time where studio photography was far more common, Ho’s work stood out. What made Fan Ho’s work so intensely human is his love for the common people of Hong Kong: the coolies, vendors, hawkers selling fruits and vegetables, kids playing in the street or doing their homework, people crossing streets. He never intended to create a historic record of the city’s buildings and monuments; rather he aimed to capture the soul of Hong Kong, the hardship and resilience of its citizens. Dubbed the “Cartier-Bresson of the East”, Fan Ho patiently waited for ‘the decisive moment’; very often a collision of the unexpected, framed against a very clever composed background of geometrical construction, patterns and texture.
Composition
This image that was captured by a photographer by the name of Fan Ho has really intrigued me and has made me want to look deeper into light and dark photographer and what outcomes it can produce. In this image my most favorite part of this is the ray of sunlight coming through from the top and how it manages to illuminate everything in there but just as a silhouette. The location where this image was taken is very interesting its in an ally way but there is water almost like a river in the ally way. There is strong leading lines down the center of the image as if it is an infinite river of some sort. The strong contrast from the pure white sunlight beaming down as the surrounding of the shadowy silhouettes are revealed from the light. The mysterious fog and mist that are blinding the vision of what is beyond this point. The chiaroscuro of blooming sunlight floods into the dark. In this image I can tell there is a low aperture from between f/1.8 - f/5.6 as there it is in low lighting and there is a narrower depth of field. In addition there is a high shutter speed as we can see the ripples in the water meaning that there is good focus and is on a high shutter speed as the image is not particularly blurry nd unfocused in any areas. The iso is quite low as the image is relatively dark apart from the light entering through the top of the narrow ally way. We can tell from this information that this photographer is highly skilled and has a wide range of knowledge for cameras.
Connection
His work links to mine as I have chosen the new topic of light and dark photography. I want to capture images of light and dark areas and images like Fan Ho has. He is been called by many nicknames one being the 'best photographer of the west'. He preferred to take B&W photographs because, like he said, black and white offered some distance from the scene, from real life. Unlike Cartier-Bresson and many street photographers, he enjoyed cropping. He said it feels like making a movie and actually enjoyed the editing process. When he was young he was actually using his family bathtub to develop his images. As you can see in his photography, he loved to utilize rhythm. Not only is his photography good but he has other reasons as well and a back story to that can inspire the younger generation such as me as it has done. He shows that photography is not just taking pictures and there is a lot meaning behind them. This is how I want my photographs to be like as well I want my work to have an effect on the people and make them feel the meaning and emotion behind it and not just a simple photograph with no backstory or moral behind it. (Light and dark photography doesn't just have to be black and white as it just means dark areas and light areas.)
Comment
I really like this photograph by Fan Ho and the thing that had stuck out the most is the light coming in from the top and the silhouette of the man paddling on the boat through a really small aisle between all the building that look like they are gonna collapse and the way they look tilted. All these techniques really catch my eye and all of these. I aspire to capture images such as Fan Ho has. All the techniques and the location it was taken in is just perfect in my opinion. I hope that my images for this topic will come out just a nicely as Fan ho's pictures have.
Liam Wong

Context
Liam Wong is a director, game designer and a photographer. Born and raised in Scotland - In December 2015 he purchased his first DSLR (a Canon 5D III) and his debut photo series: 'Tokyo Nights (TO:KY:OO’ - capturing the beauty of night through moments after midnight - inspired by sci-fi, neon-noir, cyberpunk and Japanese animation - gained over a million views worldwide, accumulating a following online and kickstarting his journey into photography. Wong has since collaborated with many high profile companies, artists, musicians and directors.
Composition
The image above was taken by Liam Wong his street photography ha caught my attention and I am drawn in by it. The neon lights emitting its light and illuminating the area in a pink and blue glow. The reflection on the wet ground from the rain of the light reflecting off on that too and the people walking around adds that nice detail into the image. There are so many windows and building with a reflective glass on it and the lights just mirror off of all of them. The light creates a sort of futuristic look there as if all of it is high tech and more advanced. This one of many of the exampled of coloured light and dark as I have numerously stated previously the only source of light coming from all the shops neon signs and the huge sign radiating its light. This image looks like it was captured on an ISO around 400-800 as the image is relatively dark and he may have taken this image and edited with it a bit in Photoshop to make the lights brighter and stand out more. The cyan, pink, purple and magenta colours emitting from the light add so much detail.
Connection
This links to my colored side of light and dark photography I didn't want to explore simply black and white images I wanted to explore the variety of paths in light and dark photography and that's why I selected this image as it is an outstanding image and representation of light and dark photography. He focuses in capturing the neon lights in Tokyo he ha originally just done photography as a hobby but was later on inspired after watching Miguel Santana's Memories of Tokyo, a cinematic journey through the city in spring. In every if not most pictures he takes is a light and dark photograph and it includes different colored neon lights and sometimes he captures people in them too. I really like this aesthetic he creates He usually takes these images at night time and manages to capture the color of the neon lights but makes everything else black and a shadow which is what I am looking to create in my photoshoot I wish to simply focus on the colors of my chosen item (liquid) and to reflect the color of that onto the surroundings and to darken all the surroundings of the photograph.
Comment
This image is extremely interesting to me and perhaps one of my favorite as I have a unique passion for games and this reminds me so much of a video game. I find this extremely peculiar how a location in real life was somehow manipulated to look like a game. I do like this image but I think it would be quite difficult to replicate as I would have to find a location like this or create a location like this both which are challenging to do so. The way the blue, purple and pink light reflects onto the ground with the rain and how bright it is. It is the man part of the image. In the image the main thing you see is the light emitting from all the neon signs around and the rest is just silhouettes of people and building and objects. I find it ironic that he is a video game director and producer and his images also look like something out of a video game.
Andrew Shiels

Context
Andrew Shiels is a senior art director who captures images of light trials from the cars on the road using slow shutter speed and produces very high detailed work. For his equipment his camera he says he uses a Fuji xt-2 to capture these images. He really likes night-time and he gets majority or all of his images at night as the lights will be turned on and there will be a better view when all the lights are turned on. is work is really abstract and he really likes to produce abstract work.
Composition
This is a light and dark image consisting of numerous lights from cars and buildings lights glimmering and a road which is closer to view and a stream of orange, blue and white passing through and by from the headlights and taillights of cars and vehicles; extending out across the road having the orange lights on the left hand side and the blue land white lights on the right side of the road coming toward the bottom of the image and the left side going away from the bottom of the image heading to the top of the image. Furthermore there is a city in the background of the image with buildings illuminated with lights and appears to be small as the distance is quite far away from the point of where the image was taken. There are strong leading lines in the image with the trail of the light created from the cars using a slow shutter speed to create that effect and it drags the attention of the viewer to follow the line along to the building where it creates a vanishing point leading to the buildings view. It looks like this photographer has used rule of thirds and the grid method to create this image as in each segment of the grid if used to section off the building from the road and the lights then they have used the rule of thirds. In my opinion it looks like this image was taken with a tungsten filter and was taken with a Fuji XT-2 camera, with a 18-55mm lens.
Connection
This links to my work. The light trails from the car and the time of day setting and the techniques he uses all link into the theme of light and dark therefore I have chosen him instead of the other I had pickled and changed as his work will link to mine so therefore I have researched him and his images and i am intrigues by his outcomes and I wish to produce images like these.
Comment
I really like this image and the idea of the light trails using slow shutter speed I really like all the shapes and patterns you can make using light and slow shutter speed it is like drawing in the air and I want to attempt and experiment with these settings and techniques and I believe I can create some very high tier and detailed work for my website therefore I want to have a go at this topic and feel like it will improve my website drastically.


Coggle MindMap


Shoot Plan
My idea for a photoshoot is to use a unique and specific type of lighting called low key lighting. Shadows are highlighted in low-key lighting, a type of lighting used in both film and photography. Hard source lighting is used in the scene to create the desired look. Low-key lighting, as opposed to high-key lighting, aims to make the subject and surroundings more contrasted. Dark tones and shadows are used to achieve this. Low-key lighting is characterized by shadows, inky blacks, and gloomy tones. Whites and mid-tones are scarce to non-existent. I will get a white chess piece and surround it in either a black box or paper and be in a dark room using the lighting technique flashing a light on the piece making it the main part of the image and all the focus goes to the chess piece.
This is how to create a low key lighting photograph by doing the following settings: Set your camera to manual mode. Set your ISO as low as it will go and your shutter speed as fast as you'd like. Once you've set up the shot, adjust your aperture to a low f-number. After you take a practice shot, narrow the aperture down until there's no light in your frame.
Here is an example of what low key lighting looks like and an example of how I want it too look like and what I want to recreate:

Link
These ideas and photographs link to my project and chosen theme as for my first visual as you can see the image I had put under the text is also in my mood board. As I have mentioned numerous times it does not have to be just black and white there can be different colors involved too. It links to my work as I said before it is in my mood board and it is one of the photographs I am looking forward to because you could manipulate the light and color with out having to use Photoshop you can simply adjust a few things in your camera settings and your positioning and you can create an entirely different image. In addition in my second visual it is also in my coggle mind map of Light and Dark photography. However there is two different key lighting. One of them being High-Key Lighting and the other one is Low-Key lighting. I have decided to pick low-key lighting as I find it more intriguing and prefer it more than high-key lighting. It also links to a picture in my mood board the flower one(third one). The key lighting there is on the petals of the flower and the background is pitch black. That is and example of key lighting. Therefore I have picked them as they also link to my work quite well.
Equipment required for shoot:
- Canon DSLR Camera
- Black background(paper/box)
- Flash
- Lights(lamp)
- chess piece
- Dark room
Shoot 1
In this shoot I was experimenting where I should take these photos to see which location and background would be bet to use for this shoot and had to see where I shine the light and what angle or how far or close I can get where I place the chess piece.


Best
The light reflecting and illuminating the right side creating a shadow or silhouette and the high iso creating that dark photo and the contrast between the chess piece and the background.
|
Worst
This is the worst only because it is the only one out of focus and isn't you can not see the shine and glistening reflection on the object and it is just blurry although the shadow is there.
|


Photoshop Edit

Shoot 2


Shoot 3
For this shoot I had experimented in trying to take a bright object or shiny object and make it stand out in a dark background using paper and a box or in a dark room.


Best
I think this is my best image out of the shot because of the illumination radiating from the pinecone and the gold shining that is coming off from it. Also the way the photo was taken the angle how it is slightly slanted and on the far right of the screen. In addition the shadow that is created beneath the pinecone.
|
Worst
In my opinion I think this is the worst image as it has captured some of the background outside of the original background but this can be solved by being cropped but also because of the creases showing in the bottom right of the image and the pinecone isn't as radiant or shiny as the image on the left and is a bit blurry.
|
Photoshop

For this photoshoot I was experimenting with what I can do I had used the clone tool for this to create multiple pinecones all around the images however some of the background wasn't entirely black so I had used the paint brush tool and gone around some pinecones and in the background and made it as dark as possible.
Shoot 4


Best
I think this is the best image as it it taken from a different angle and is slanted and also because of the reflective rays coming off from the object from the torch light and the shadow it is making and creates on the left side.
|
Worst
I don't like this image that much as it is too dark on the left hand side and the full paper does not cover the entire things and would have created creases if I were to add more and I feel like it's too plain.
|
Shoot 5


Best
|
Worst
|
|
I like this the most and think it is the best as it is the most developed and focused image and the little foam bumps creates a little sparkle which I like and the card the shade and light fades as from the bottom to the dark from light to dark.
|
I don't particularly like this image as it is not focused and I do not like the two cards together and would either prefer 1 or two different ones also the way one card is angles one is straight one is slanted and I don't enjoy the yellowish light.
|
Refinement
Before


I had gone onto the camera raw filter and had adjusted some of the setting on there these being the exposure I had a high exposure, I had low contrast, I had upped the highlights, I upped the whites and I had decreased the black to create a more darker image but brighter object.
The I had increased the texture and made it more detailed and enhanced as you can see the sparkle and dust on the foamy bumps and creates like a bright light or shine. I then decreased the clarity to make it have the texture but still being smooth and my main focus was the bottom left of the card. I then dehazed the image a little bit to make it more developed.
Then to finish it off I had added a vignette and created a fade in from the image into the background and on weebly it looks like it is a part of the image and is on the website similar to what I had done to the previous image on the chess piece.
After

Shoot 6


Best
I like this image a lot as it is meant to be a transparent object but here it has a metallic solid look and it gives a nice shine down the middle and there is strong leading lines on the edges of the pyramid and the fabric has a smooth texture and you cant see any of its creases.
|
Worst
This image is the worst out of the galleries as it not focused and can not even tell there is a pyramid in the picture and the fabric is not smooth although I do like the lines and patterns it shows but I prefer it to be like the previous image and be smooth and darker.
|
Town Trip
For the next few galleries and images I had gone out into town for these images to try and capture some black and white images and such using natural sunlight and using manual on the camera. I had to adjust the ISO, exposure and white balance and some filters to make sure that the image is as dark as it can be but not so dark that the buildings can not be seen.


Best
I like how this image is quite misty and the blur on the poles and pillars but the focus and field of depth on the square shape that perfectly frames the other square above. I like how it takes away some of the texture and looks smooth.
|
Worst
These images are all nice but out of the four this looks least best as it doesn't capture the first square fully and is out of frame and we can see the rusted metal which can be a good thing for texture but I would prefer it more smooth and clean.
|


Best
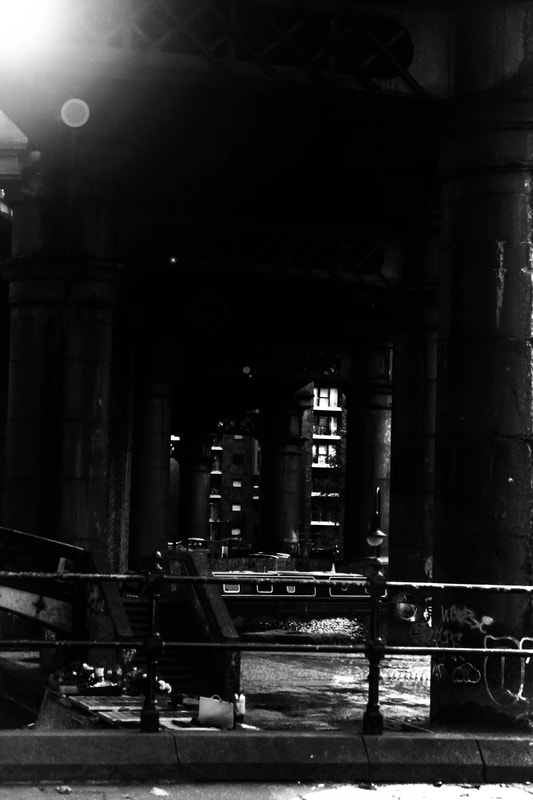
I like this image the most as you can see the framing of the bridges gate and the little shine point on the building it is not on any other images therefore it is unique and the best out of the gallery and also like the shade filter I had used on this.
|
Worst
This is also a nice image but I don't like the tungsten lighting on it and filter and would prefer it to be like the first one and nice and dark I think the tungsten makes it to bright for me and the reflection of the light at the bottom on the other one isn't on this one.
|


Best
I think this is the best one in my opinion as I like the shadow on the left side under the bridge and how dark the image is and it really shows the black and white and how the light from the sky is being framed.
|
Worst
This is too bright for light and dark therefore I don't particularly like this image and the light through the bridges framing is shining too much and it is not showing the shapes on the bridge and is too bright.
|


Outcome 1
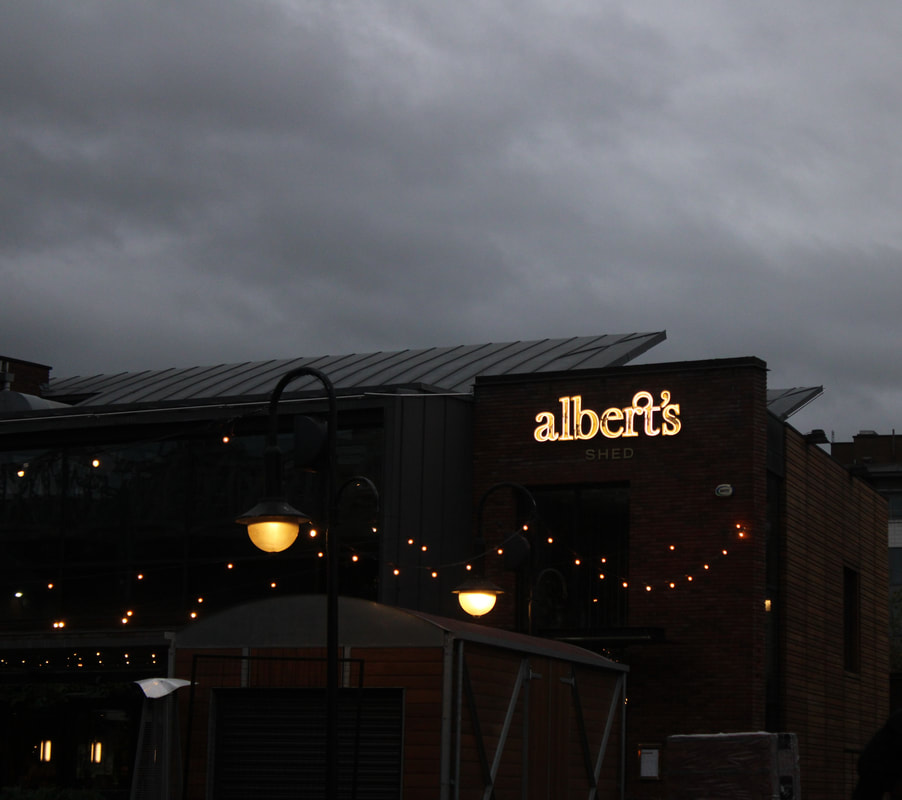
Before:

Steps
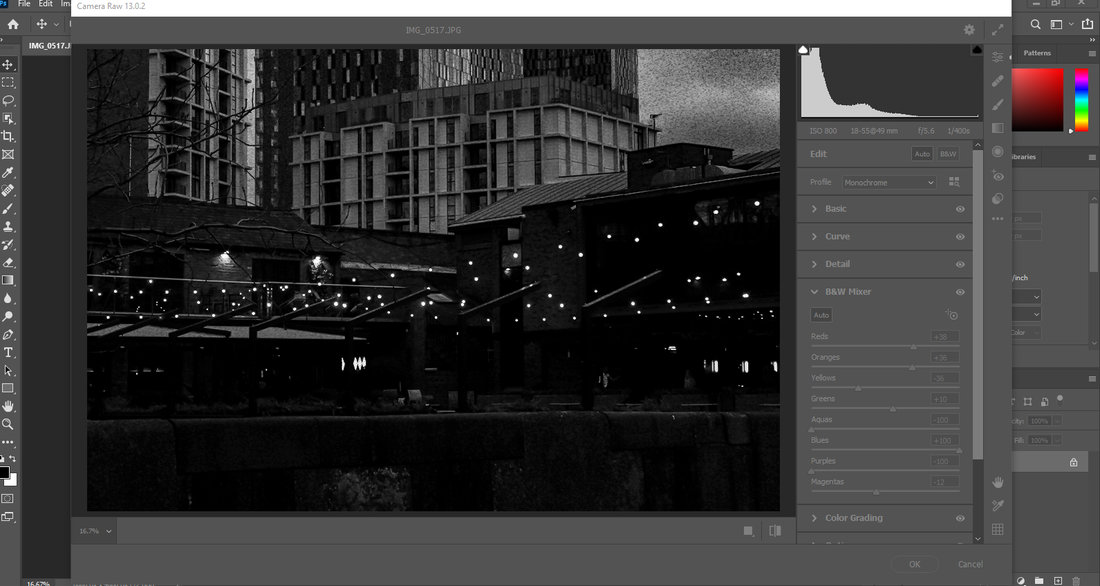
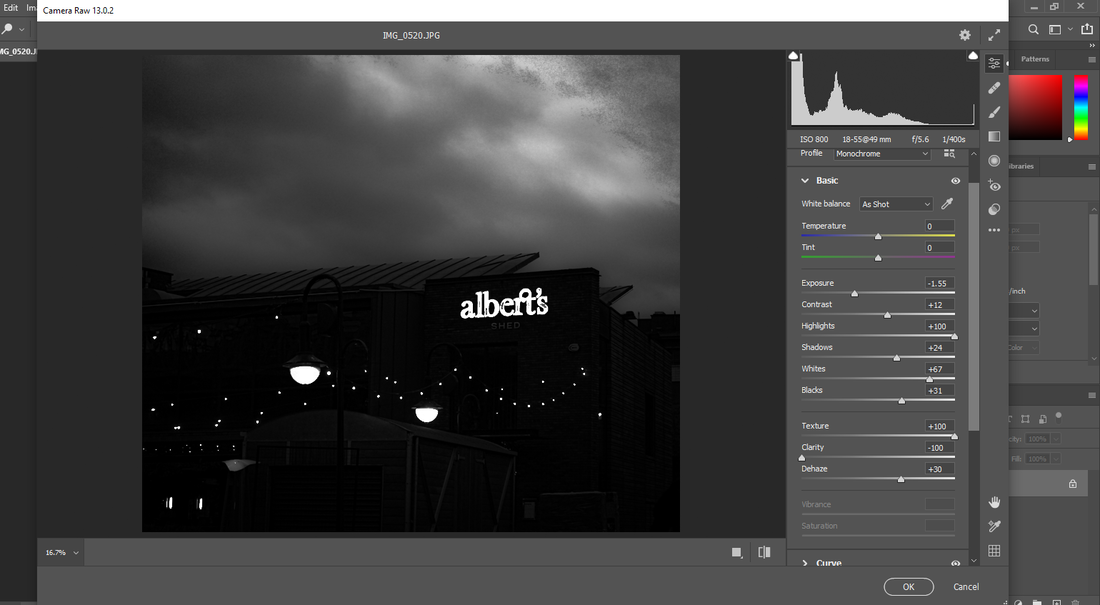
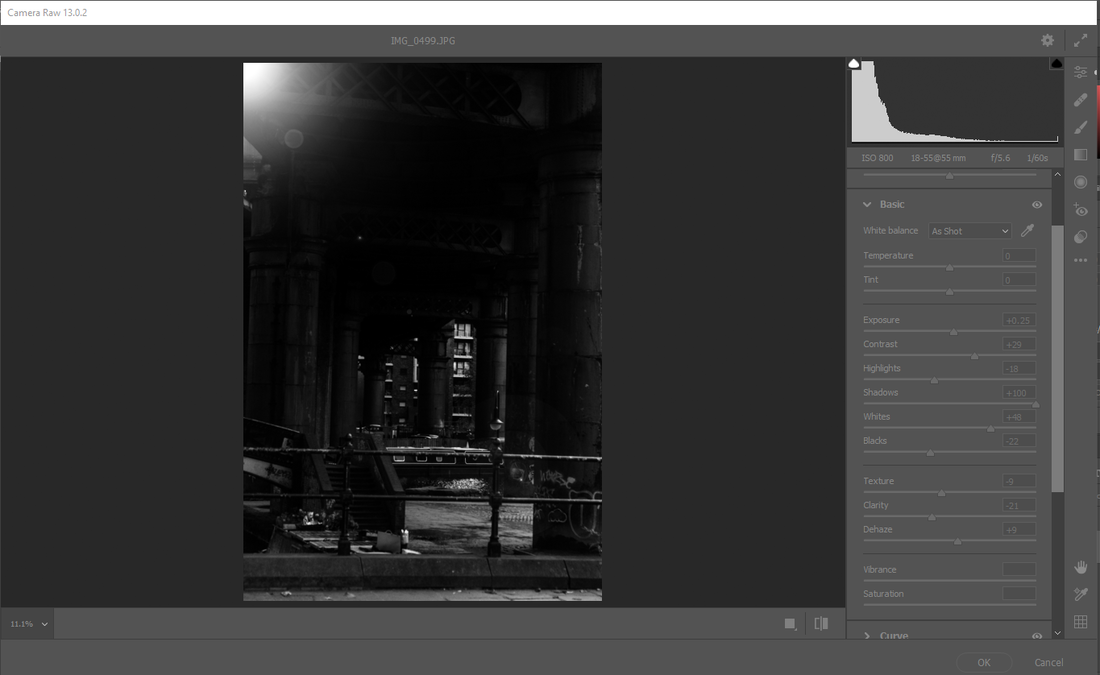
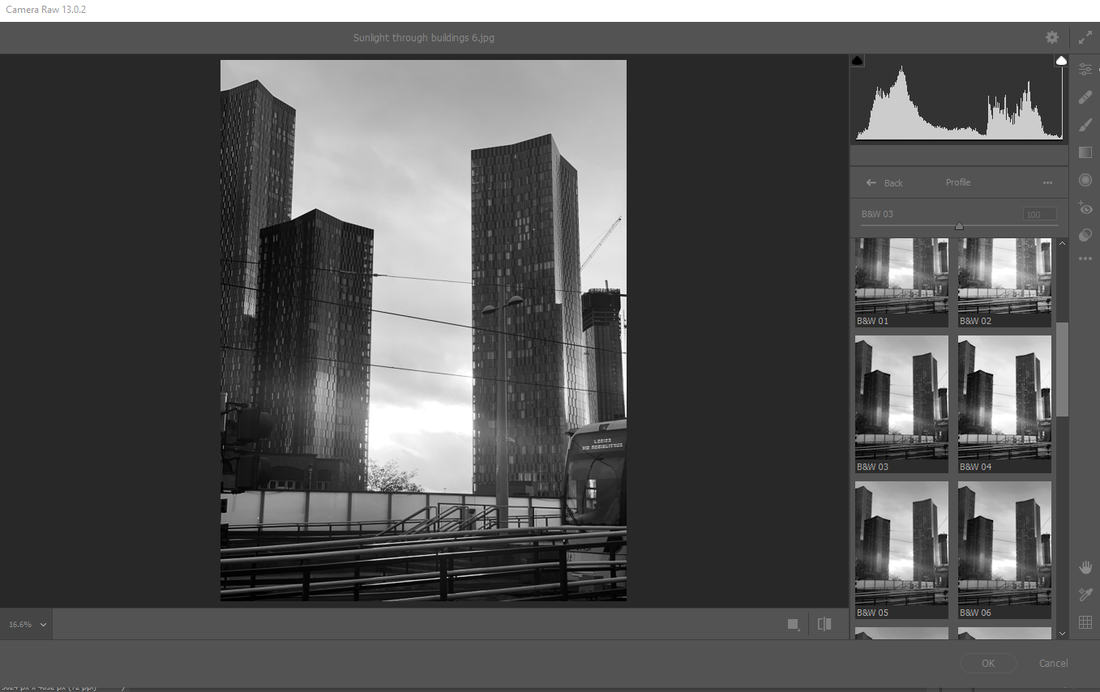
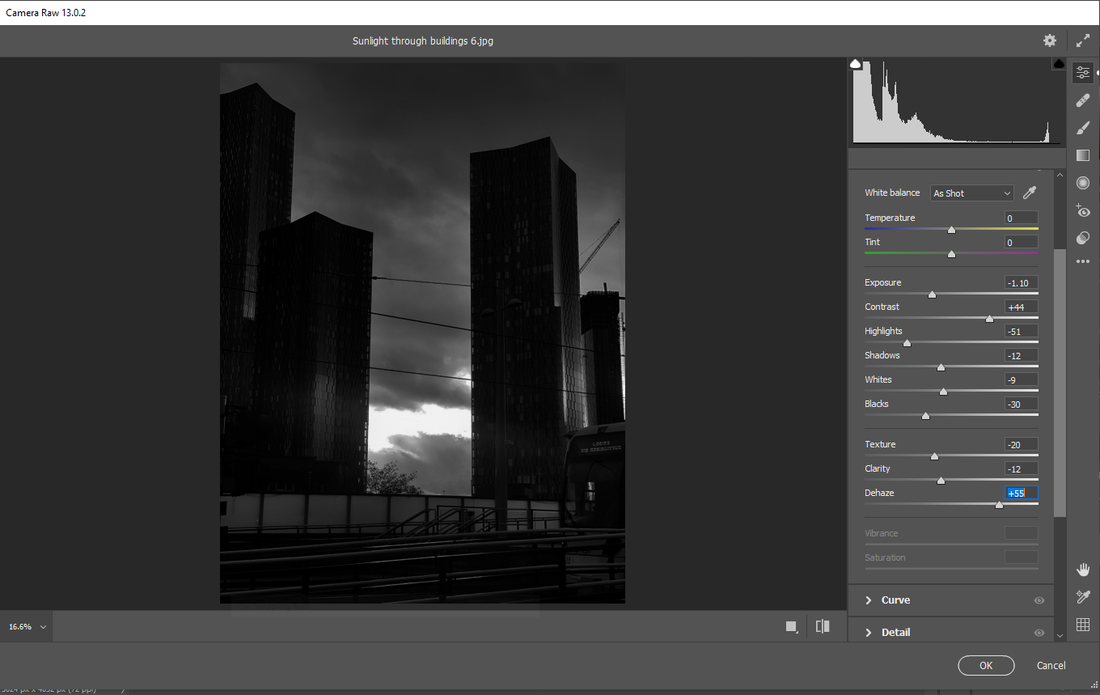
Step 1
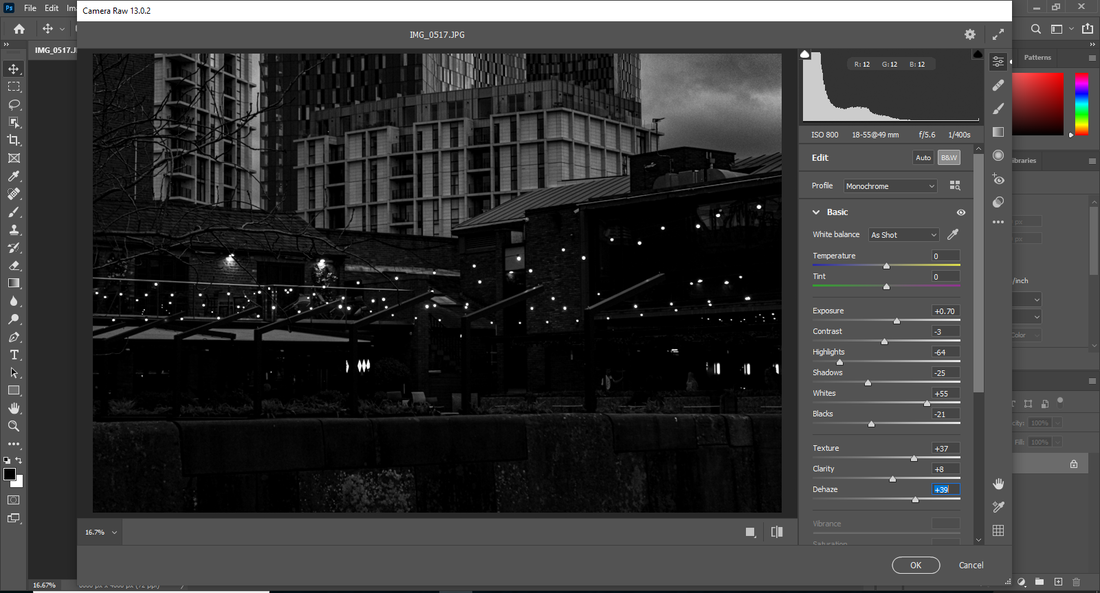
The first step I did is I had went into the camera raw filter by clicking filter at the top and then camera raw filter then for the profile and filter of the image I had put a monochrome filter on to get that black and white look then with the other options I could edit I had chosen for exposure to set it a bit higher to make the lights a bit brighter then I had lowered the contrast a tiny bit to make it more dark, for the highlights I had lower it again to make it more darker for the shadows I had lowered that to make it more dark and so that the lights are the main focus of this image. For the blacks I had realized it was getting too dark so I hadn't lowered it a lot just a bit so it is still dark but not too dark. For the next three options for texture I had increased it to add more detail to my image, for the clarity I slightly increased it as I liked it to be smooth but still want some of the texture to come through and the for the dehaze to remove any grainy areas I had upped it to make the sky and building look more smoother and less grainy.
Step 2
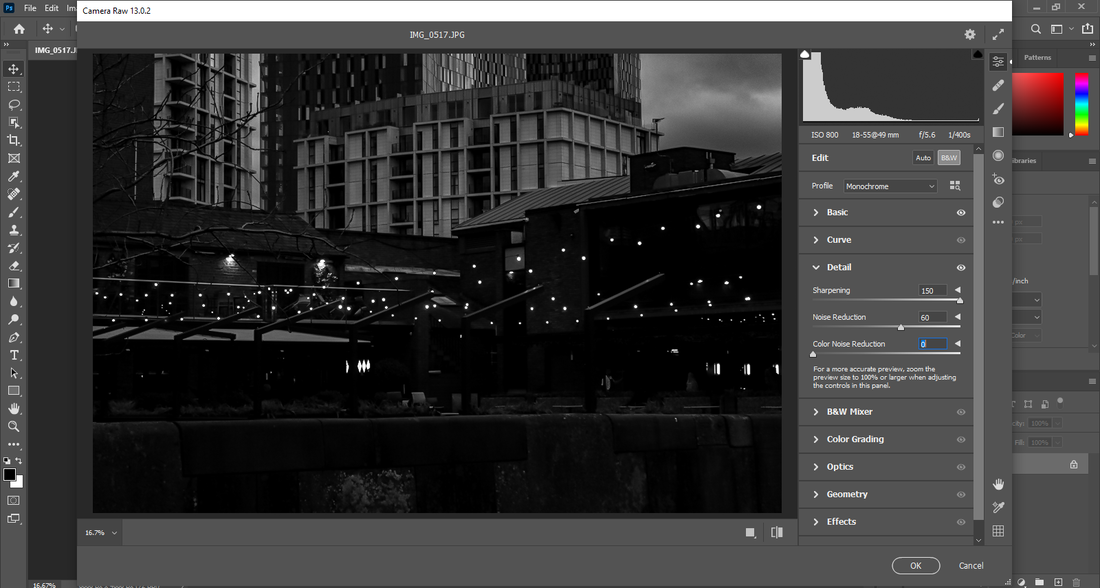
For the next steps I had went into the detail area and had increased the sharpening to the make just so I can get all the detail into the photograph and so it is more refined, then I had increased the noise reduction so this makes it more smoother and just removes more of the grain in the image. Since it is in a monochrome filter there was no need to adjust the color noise reduction as it will not effect the image.
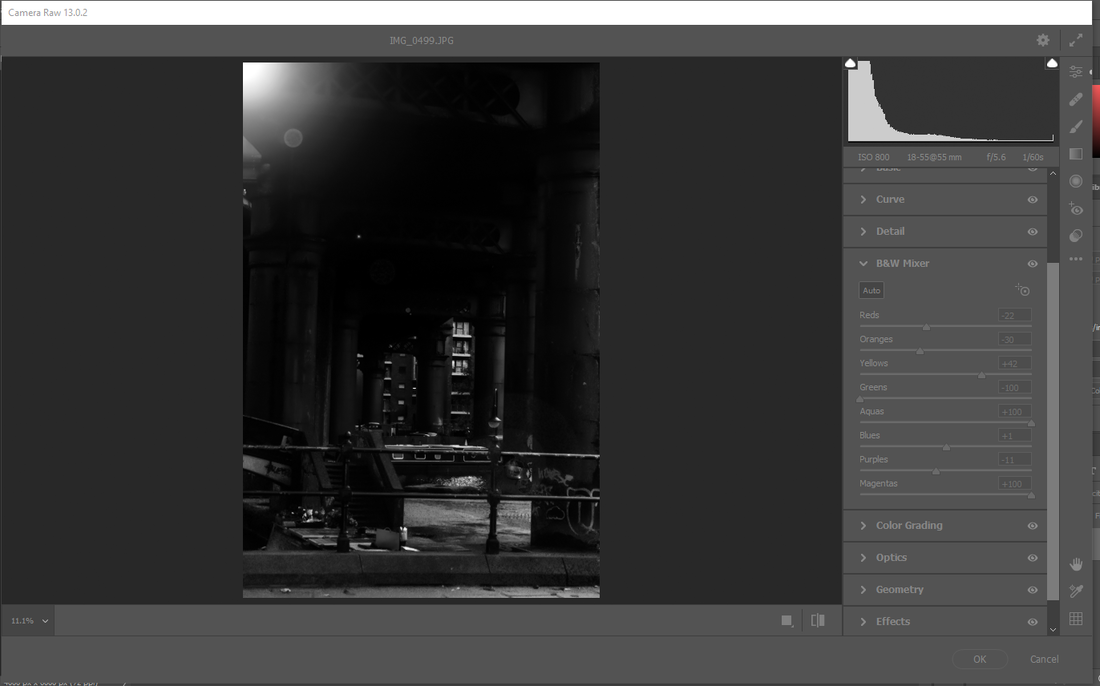
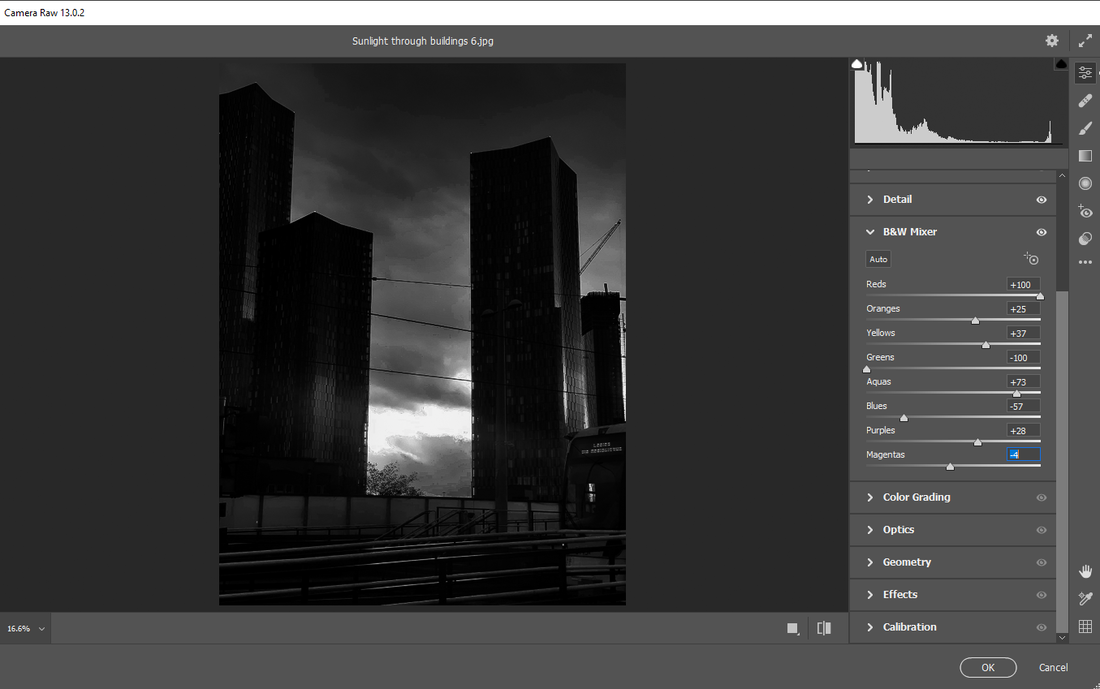
Step 3
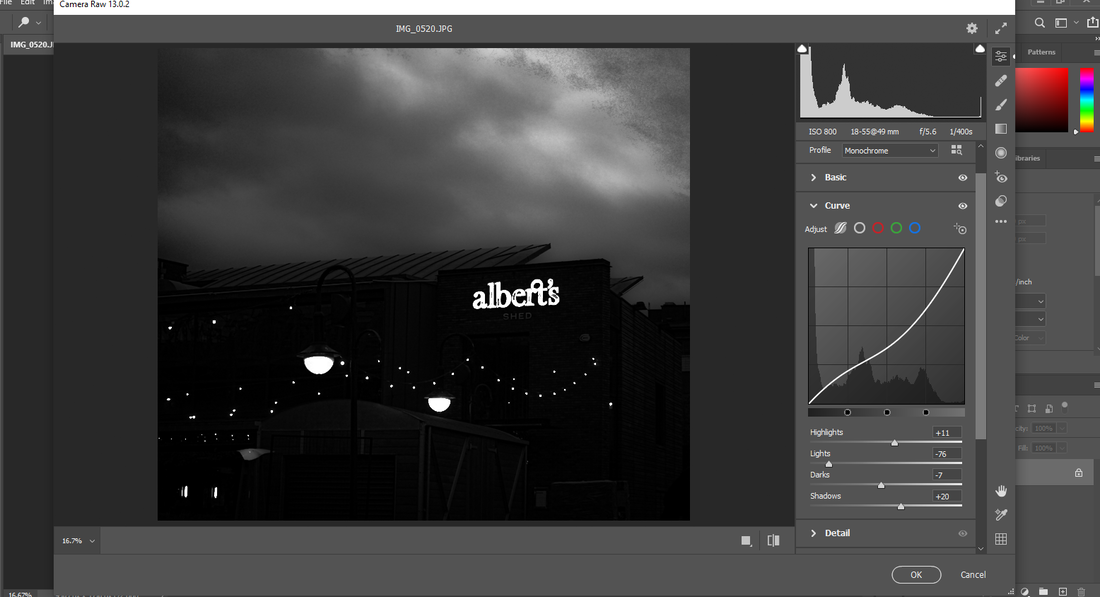
Although it was in black and white I had gone onto the black and white mixture and had found at that changing the colors strength on this image actually does effect the image and does highlight some parts. So I had done this and made the red, orange and yellow so that the lights will illuminate more and have a greater shine nd then for the others I had decreased or increased to reduce the grain in the sky and make the sky have a nice and silky effect on it but as I change the others I may effect the sky and other objects grain too.
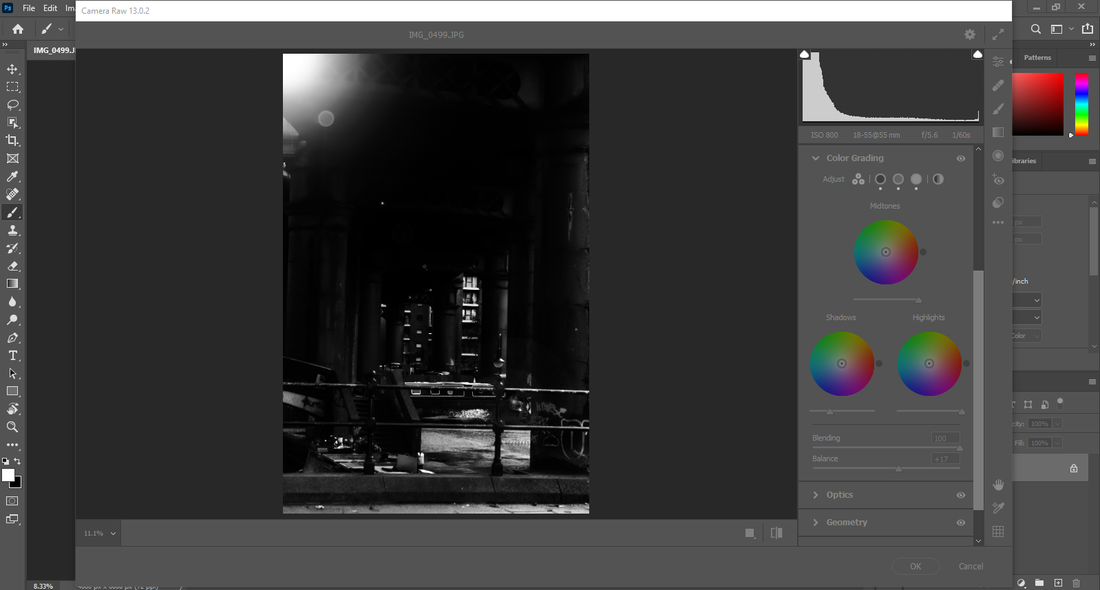
Step 4
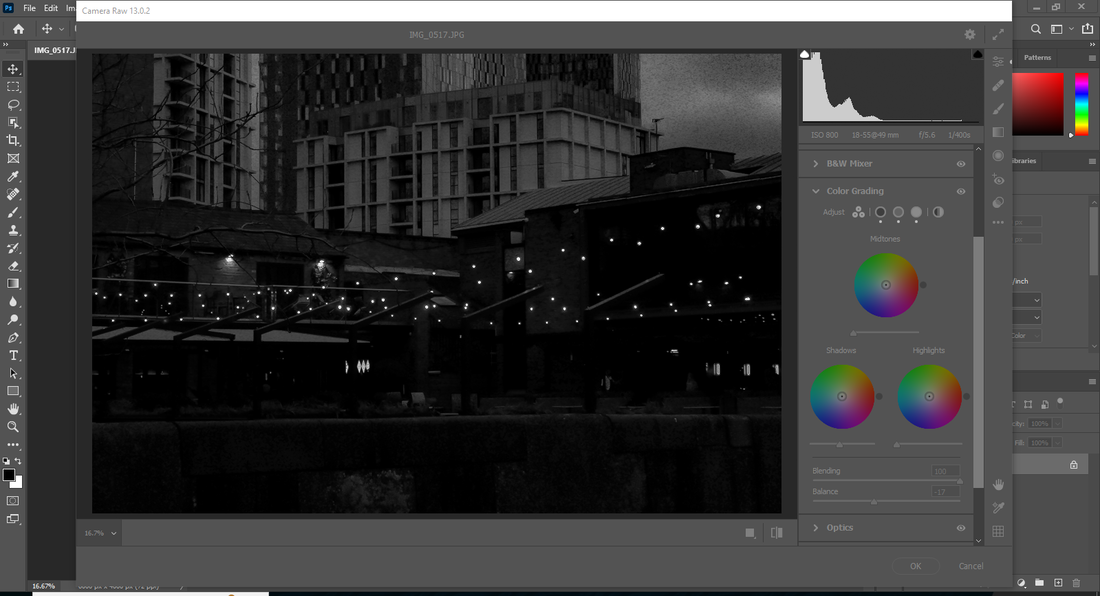
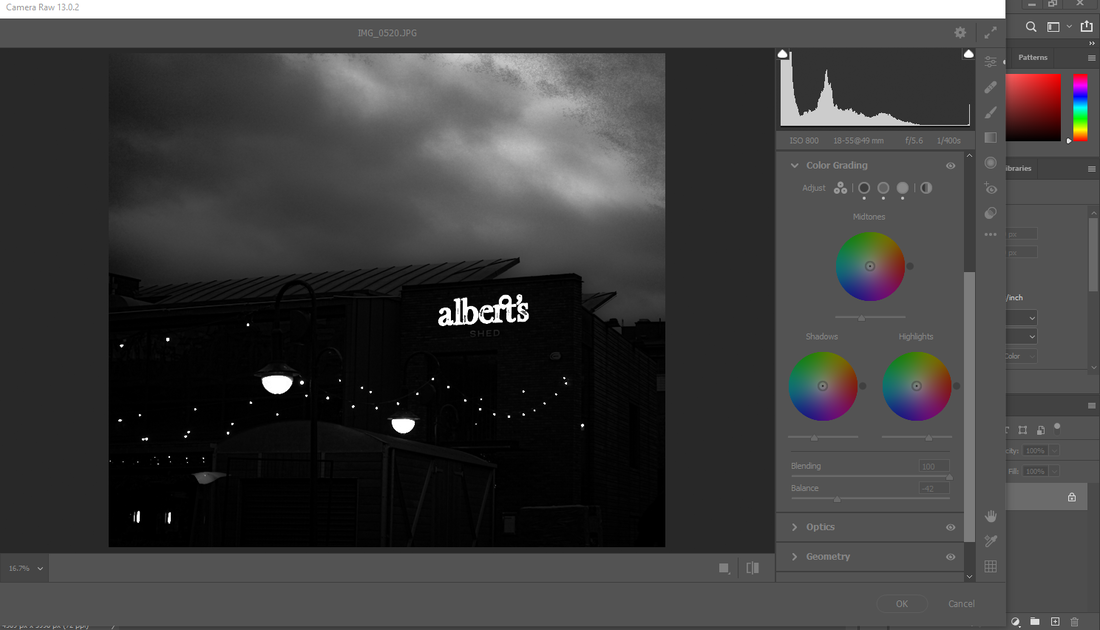
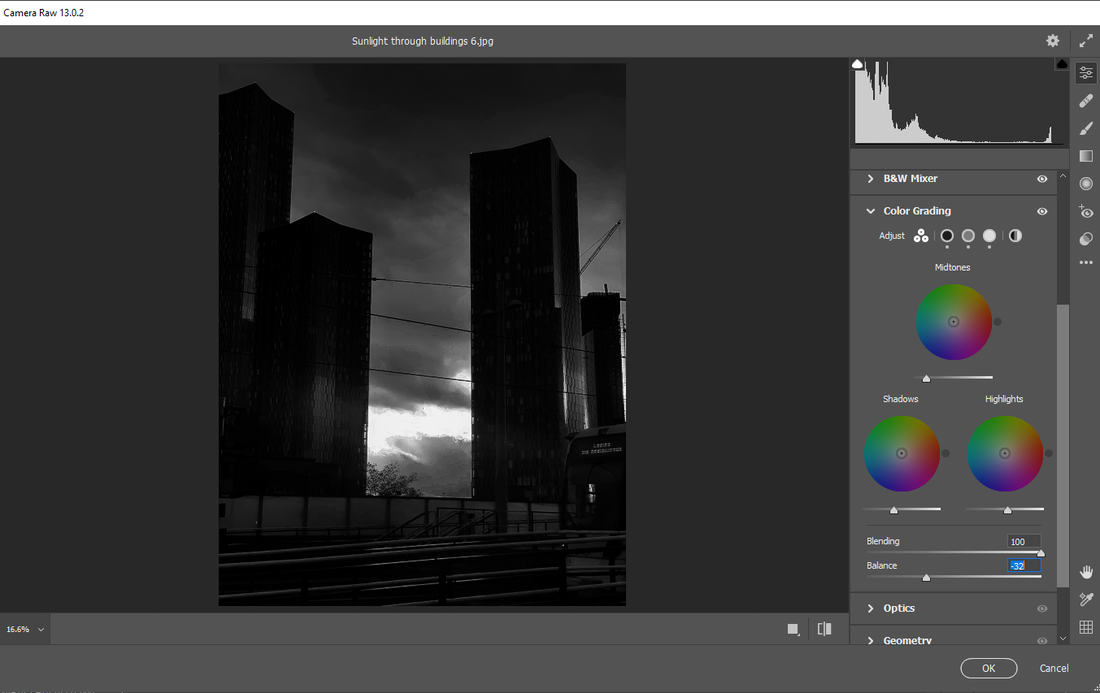
Again even though there is no color in this image changing and messing around with the color grading I had lowered the mid-tones of the image and had realized it had made the image appear to be more smoother and had reduce the grain off the image and that was sort of my main goal on this image to make it nice and smooth without a grainy effect but also by letting the lights be bright then for shadows I didn't want it to get too dark seeing as I had already made it dark so I had slightly lowered it as it does make the lights brighter. For the highlights I had notice if I reduce it the light become brighter and so do the whites in the image so I had reduced it to the minimum. For blending I increased it to make it more clean and smooth and for balance lowering it made the sky brighter and the landscape darker so I had decreased it a bit.
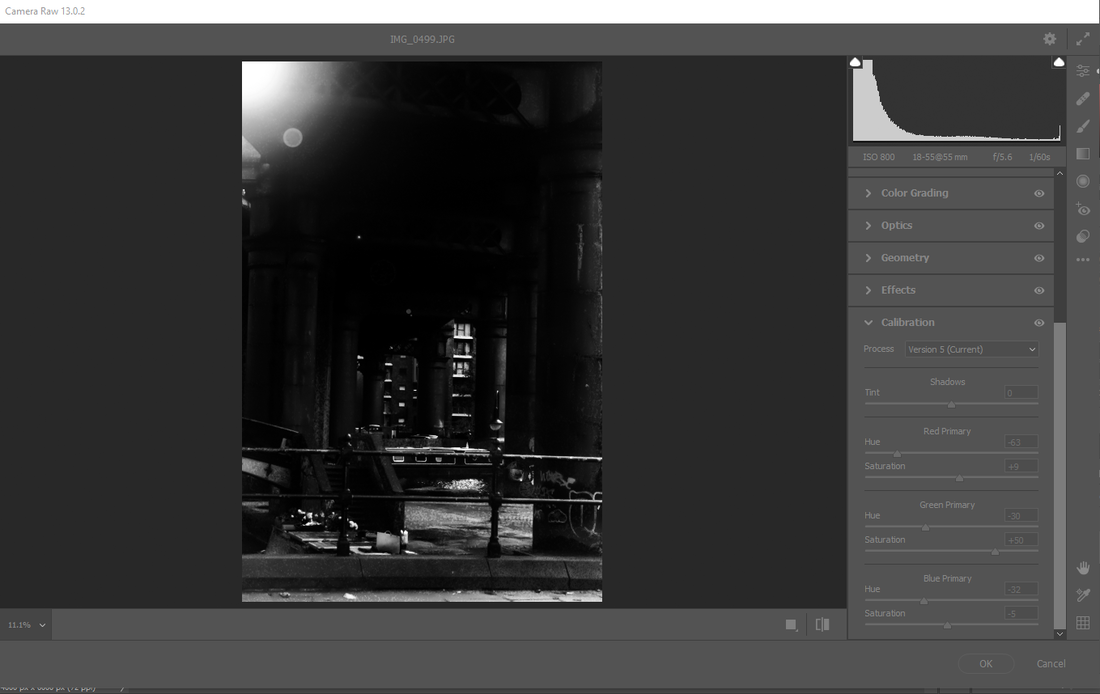
Step 5
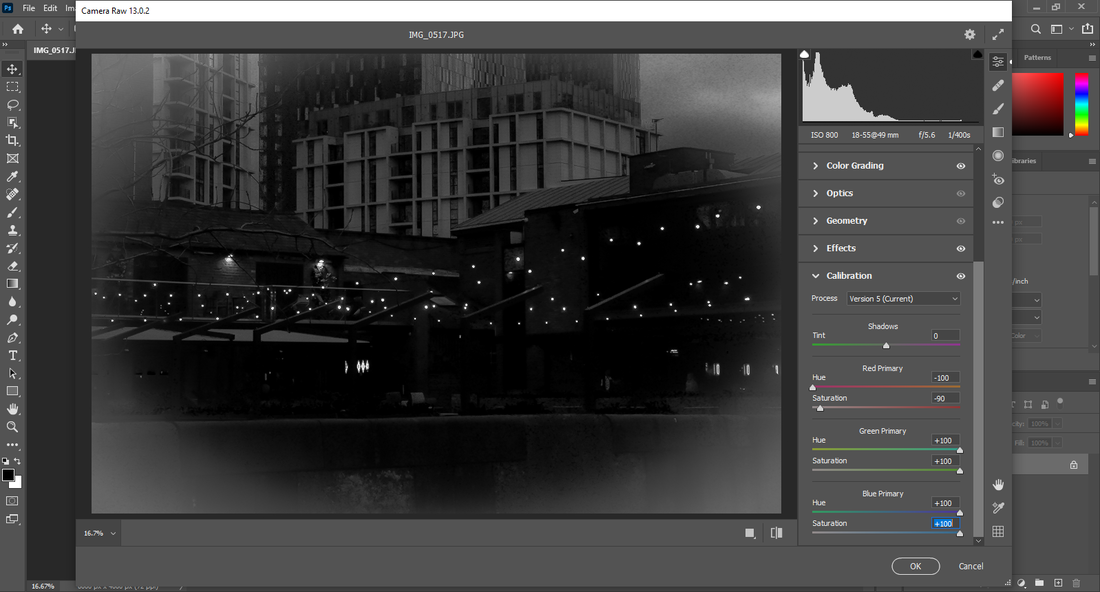
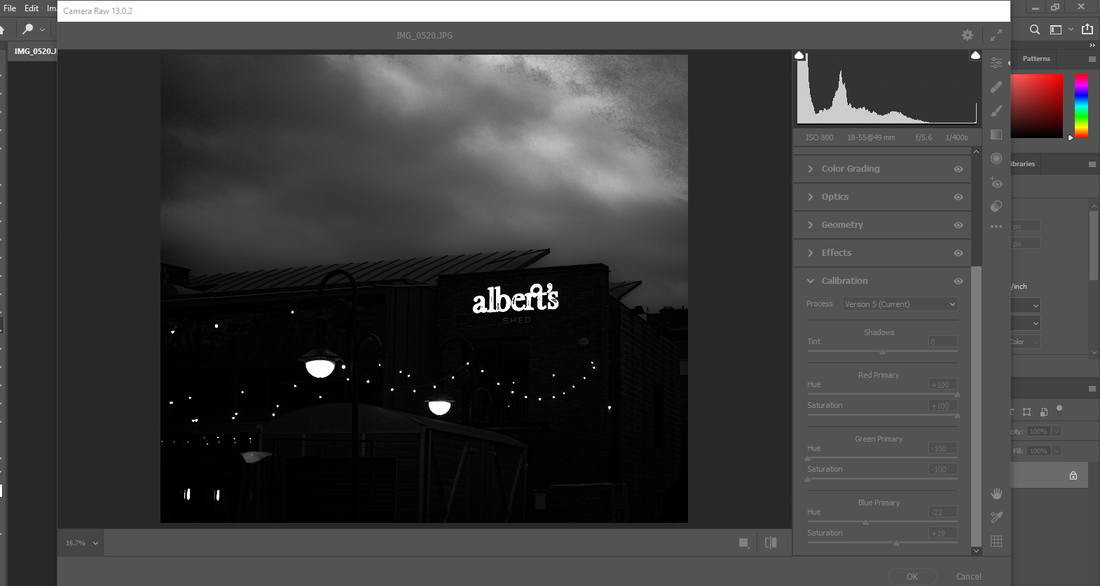
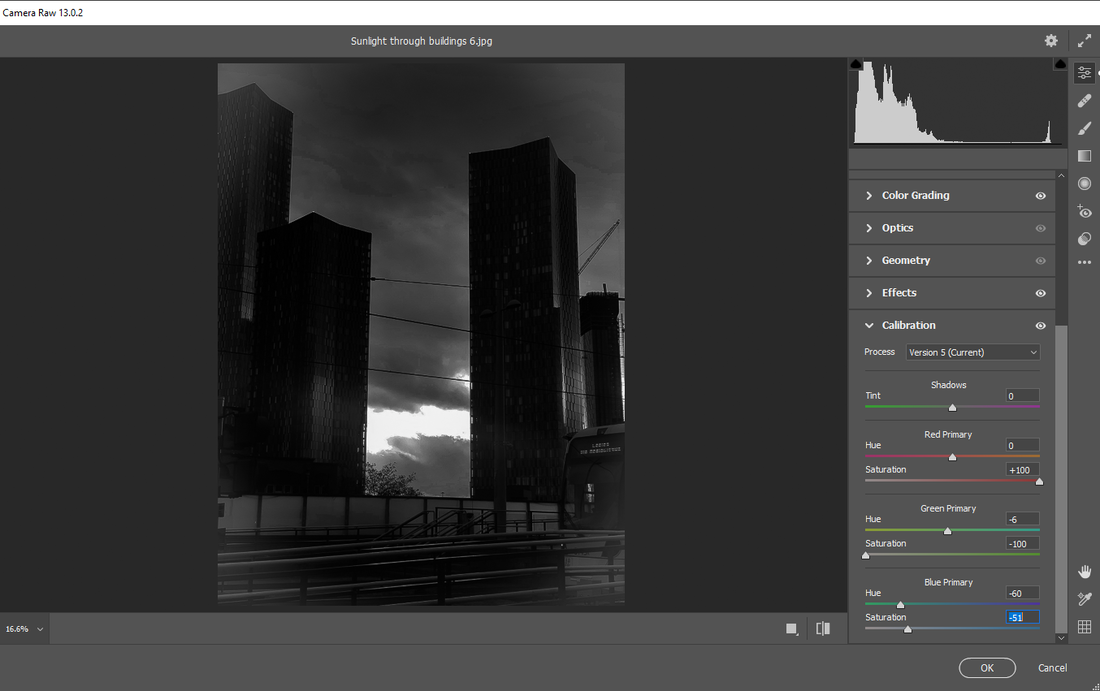
In effect I had added a vignette but later realized I hadn't liked it so I had changed it after all the setting were set. The I went into the calibration section and for the red primary I had lowered the hue to the minimum and had lowered the saturation a lot as well this had made the image more darker around the surroundings and the lights even more brighter, then with the green primary I had increased the saturation and hue to the maximum to make the plant and greens come out as the image looked quite lifeless and just building I had wanted to include some greenery and plants. Next, for the blue primary I had maxed out the saturation and hue to make the sky more refined and smooth as it was quite grainy after all the effects applied.
Step 6
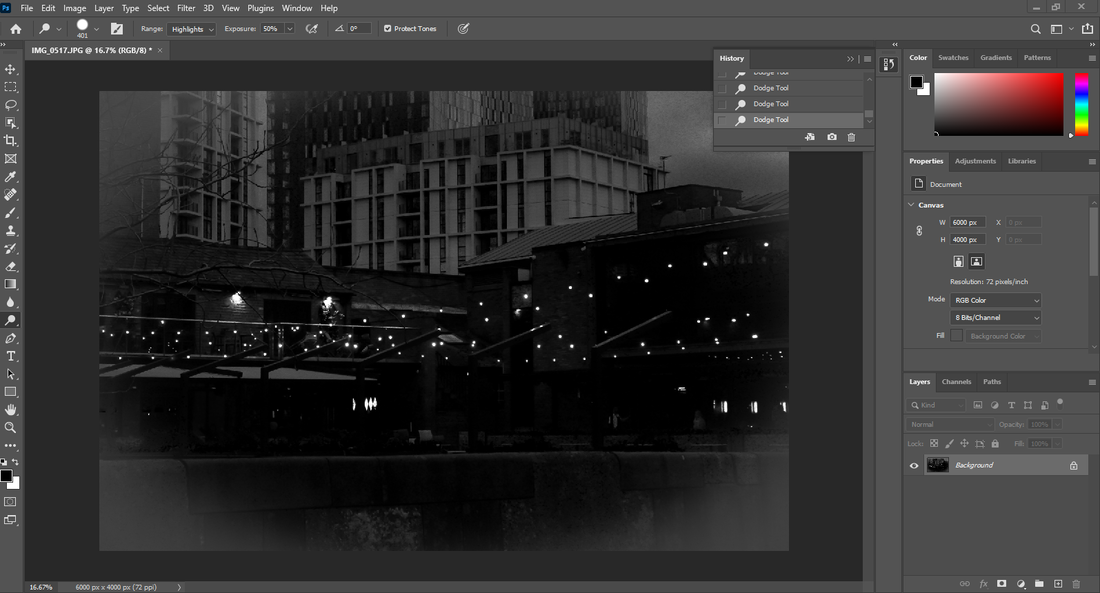
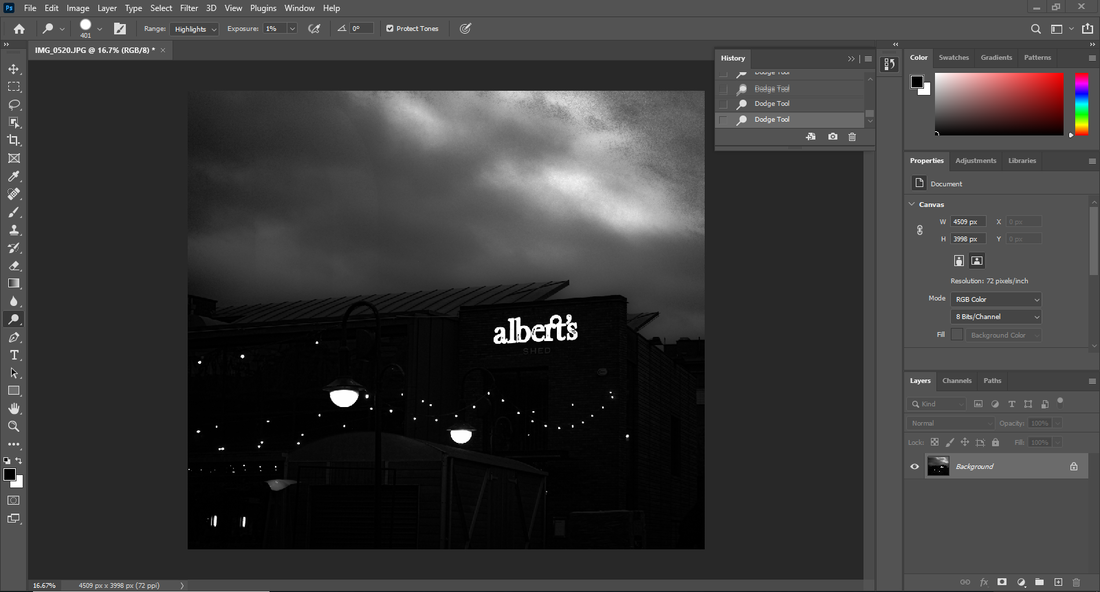
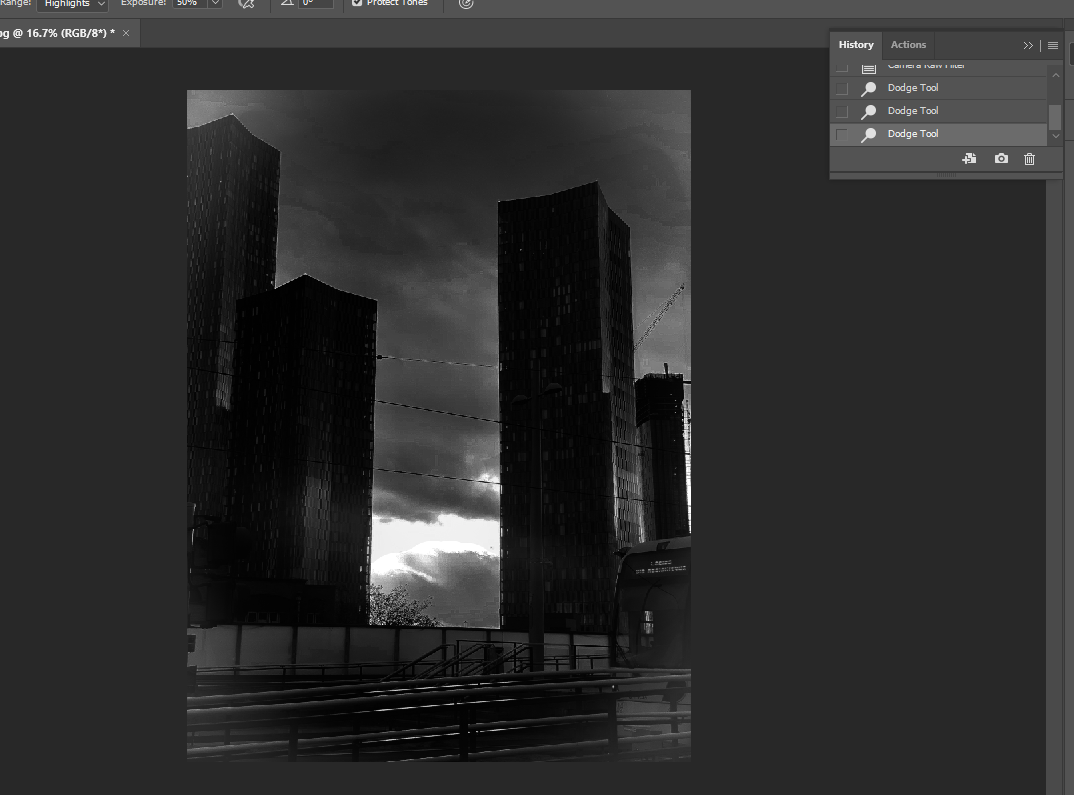
After I had finished all of the settings and effects in camera raw filter I remembered that the dodge tool makes whites brighter so I had used that on the light and it had made it much brighter and was happy with the outcome and I had lowered the vignette a little more as it was too thick and had ruined the edges of the image so I hade made it slight more faint so it just covers a tiny bit of the corners of the image.
After:
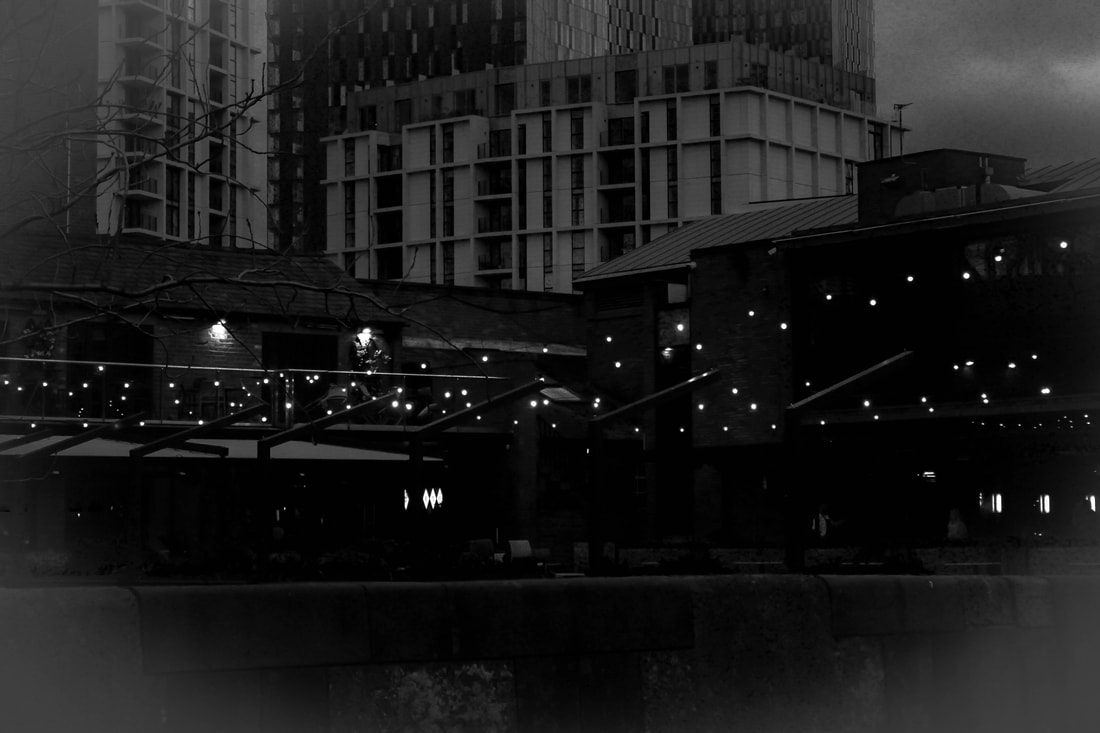
In my opinion I think I have done pretty decent on editing and refining this image in photoshop as it was quite hard and challenging to find the perfect and exact strength of the colors and lights and trying to make the whole image smooth while still having showed detail and still making the lights shine It was quite difficult. In addition I had to find an image which would work with my target as most of my photographs are only involving natural sky light and no sun nor electricity lights so I had to make sure I had hosen the best and correct image to refine. I am very happy with this outcome and my favorite detail of the image is the vignette around the image I think it just adds that extra touch and depth of field. I like the contrast between the lights and Alberts shed compared to the building and sky above it. A few things I could have improved on would be on trying to make the image less darker and trying to make the light a bit less brighter so you can see the lights and also it doesn't look like white spots that were simply drawn on and the graininess and smoothness of the image was quite hard to manage to balance. Overall I'm satisfied with the image and know how to improve it.
Outcome 2
Before:
Steps:

After:

Outcome 3
Before:

Steps:
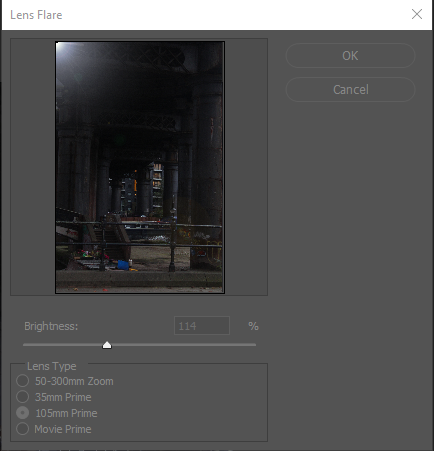
Here I had edited in my own light by going into filter and then clicking lens flare to add and create my own source of light.

I had then turned the image into a monochrome filter.
Then in camera raw filter I had experimented to see what adjustments and setting enhance the image and makes it better.
I noticed that changing the colours even though it is black and white it does have an effect so I had done some adjustments and changes using that.
Here again just a few adjustments on the brightness, highlights and blending.
As I mentioned before changing the colours strength and saturation and hue it does have a change on the image so I had changed some of the setting to see which ones can improve the image.
After:
Outcome 4
Before:

Steps:
After:

Outcome 5
|
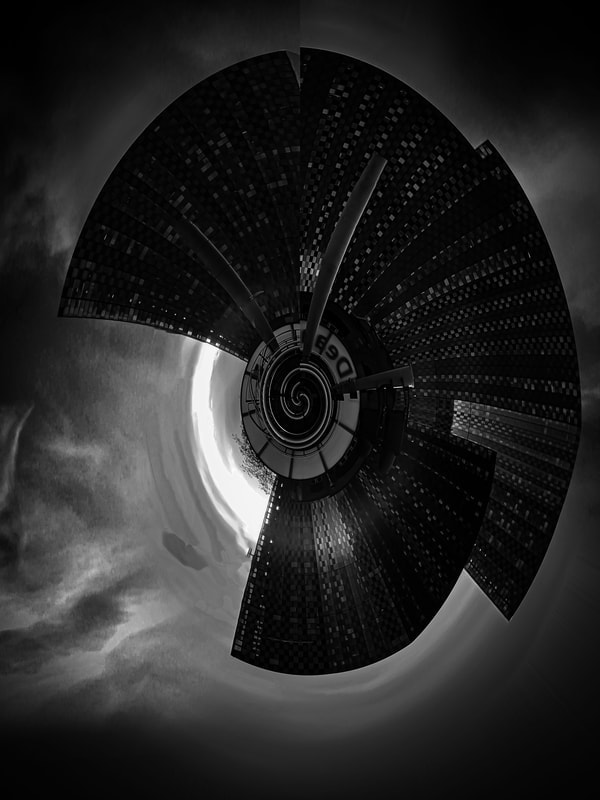
|
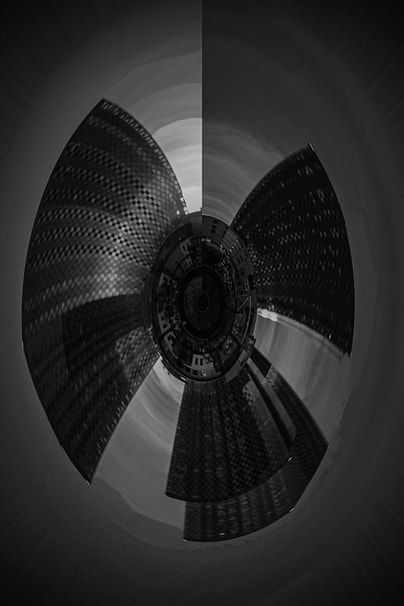
First step is to bring in your image select filter at the top then click distort then find polar coordinates to create the globe effect. Then you can use the spot healing brush to blend in the line which it makes so it creates a full globe. Then you can go in camera raw filter or add in any edits and make any adjustments to the image.
Here's the tutorial:
https://www.youtube.com/watch?v=EfhCJvgdeNw
Here's the tutorial:
https://www.youtube.com/watch?v=EfhCJvgdeNw
Final Gallery


|


|


|

|

|

|

|

|
Evaluation
The theme I had chosen for this project as light and dark I had picked this as while ias looking into I notices the huge variety of different sectors and stuff to take photos of and how it is not just one thing but have loads and loads of different topics and sectors branching off from it that is in the category of light and dark. Light and dark can pretty much be anything if skilled enough to capture it. I was very intrigued in this and I had decided I wanted to experiment and look further into this and I had enjoyed it and found it very amusing ho many different way of taking photos and this topic had expanded and had a huge impact on my knowledge of photography. It had made my creativity much more better and wider. My skills and knowledge in the camera settings and using photoshop have increased a lot since my last project as I have discovered new ways to edit my photos and a variety new settings in the camera that i can adjust to produce the image I want. Something I have developed on in this topic is ho to adapt to my surroundings and using different light either sunlight or a lamp and hat room in in to take the images and ho I use objects around me to make these images.
I have found the use of camera settings and using different objects the most incredible part in photography the fact that I can take photos that look like they have been edited in photoshop but have just been taken with my camera using and changing the ISO or the white balance. Adjusting the brightness and focus on my images and focusing on one part of the image and blurring and unfocusing the background of the image. That is why I have found it the most interesting to me just the amount pf different setting and features and ho adjusting something so slightly can affect the whole of the image is quite amazing and I look forward to continue developing this skill as I am still not perfected on my use of camera settings. as there's still much more to learn.
I have learnt numerous of different skills from this topic and since my last subject I have not only learnt new skills but improved my previous skills. I have learnt ho I can add in and create my on light and make it look like natural light how I can change the image to different shades of black and white and how bright I can make one area and how dark I can make some areas. I have learnt how to use more of the filter and image and other options on the top rather just using the tools to make my images and how i can crate masks and layers and overlap them. I had worked out how I can correctly and perfectly adjust the setting on the cameras like the ISO or changing the hitebalance and by experimenting and using different lenses to try and create a new image that is very detailed and ho I can use different object to refract or reflect light or using different types of lighting and different objects and angles to take my images. I had not used any tutorials for my images I had discovered how to make these images by myself and had edited these with no extra support from youtube.
I would like to further develop my skill in photoshop a I want to really enhance my image and make it stand out as well it is possible to make a very detailed photo on the camera without editing with photoshop I can enhance the image so much more and improve by much more as well, Therefore I want to attempt on improving my editing and photoshop skills so I can produce and make the outcomes I ant to make and make my work stand out to not only my class and teachers but to a much more broad and huge audience such as the public. However for that to happen I first need to be able to take and enhance my images well or it will never reach the standards I desire. I will try and advance my knowledge on photoshop to improve my future images.
Three photographers who have inspired me and caught my attention by their work are Fan Ho, Liam Wong and Andrew Shiels. Theser photographers are highly skilled in taking and capturing light and dark images Fan Ho being the one who is most intriguing and inspiring. The first of these three artists I want to discuss and who I selected to examine was Fan Ho, a photographer. He became well-known for his street photography of Hong Kong in the 1950s and 1960s, which is considered to be among the best in Asia. His photos are really detailed and were expertly captured. Additionally, some of the shots and images he had taken were related to my profession, so that's another reason I chose him: I can pick up tips and tricks from him that I can apply to my photos to further improve and enrich them. He also explains the various techniques he uses to make these photographs.
The second photographer I wanted to research was Liam Wong. I enjoy how Liam Wong uses his surroundings and many environmental aspects in his shots to add more depth or make it look much better. Ironically, the photos he takes look like a game because of the different colours of lights and different lighting angles. He makes use of his surroundings by reflecting the rain to increase the lighting contrast. He is a great example of how light and dark may be used in colour as well as black and white, as long as the theme is light and dark. He also offers tips on how to create these photos, so it will be helpful to learn and advance my skills.
Andrew Shiels, the third and last photographer I've selected to examine, has expertise in practically all facets of photography. I visited his website and took note of the various themes he uses, as well as how intricately detailed each of the themes and photographs are. Not only is his work incredible, but he also illustrates how to make these photographs and what settings and methods are necessary to improve them. His use of slow shutter speeds and the light trails he produces are the main reasons I chose him. I found the making of those shots, as well as the method involved, to be quite fascinating.
Something I had struggled on with this topic is sticking to one them or branch of the topic and there was so many things I could do that I liked but I had to pick one but I could not decide and I had kept taking and taking different off subject photographs. Therefore finding some photographers to research was difficult and deciding what I wanted to do was not easy. I had kept changing my photographers to research had to keep deleting images and adding new ones and was just hard to decide how i was going to go with this topic. Also figuring out what i want to do for my final gallery and outcomes I could not decide how I want to edit them what kind of editing to do with them. As well as all of this I am a slow worker and take a long time to think so was difficult to keep up with everyone when I was also doing something like figuring out who I want to research whilst everyone had decided and already are in the refinement stage jut made me fall behind a lot.
I've gained a tremendous amount of knowledge and skills since the start of the year. I picked up all of this information utilising a variety of techniques, like watching lessons in Photoshop while using the manual camera setting. I had began taking pictures without having the slightest idea of what I was doing or what anything was. Numerous photographers were the subject of my research, and I looked into how they got their start and developed into the extraordinary artists they are now. I am familiar with a wide range of camera settings and how to use them, as well as a wide range of Photoshop tools for enhancing my shots. When I first started taking the image, I had no idea even how to do it because it was extremely complicated because there were so many buttons. However, I was able to adapt, enhance, and broaden my understanding of photography with the aid of all the tools I have at my disposal.
